Tuesday, April 5, 2011
Spring Break Approaching
Dr. Huminski and I did not meet last weekend and we are not able to meet this weekend either. This will give us two weekends to work until my presentation on the 14th of April. The plan is to be finished with the building of the desk. Everything will hopefully be completed except for the staining. Dr. Huminski says the staining is something that does not need to be rushed. We have the desk lid and the cubby inside of the desk left to complete.
Closing
The Portfolio is due in two days. Presentations are approaching. It seems that Senior Project is coming to a close. Not in the world of wood. Over spring break, I designed a cubby that we will build to be placed inside the desk. Dr. Huminski and I worked again on Sunday. In order to have enough wood to build the cubby, we had to plane more. We did not begin building the cubby though. Instead, I spent about two and a half hours sanding the entire desk. I did this to prepare the desk to be coated in Polyurethane. After sanding, we moved the desk into the paint room. Tomorrow morning, I am going to the workshop to put on the first coat. It is important for the desk and its surroundings to be inactive at this time. This inactivity prevents dust from rising and mixing with the coat of Polyurethane. We will continue working on the desk this weekend as well. My Senior Project Presentation is on April 14 which is next week. By that time, the desk will not be completely finished. Everything will be finished except for the inside cubby and the final Polyurethane coats. These final stages will be completed after my presentation.
Senior Project began as a very stressful and agonizing course. It was a hard struggle to find a carpenter willing to work with me. Unexpected obstacles like liability insurance turned into roadblocks. Initially, I did not want to work with Dr. Huminski becuase a senior had worked with him last year. Now, I am very grateful that my senior project has turned out the way it did. Dr. Huminski is extremely knowledgeable about this trade and he has an immense amount of resources. More importantly, he is passionate about woodworking and is a wonderful teacher. He has been a great mentor and guide throughout this year. I have enjoyed my Senior Project immensly and I plan to continue woodworking throughout my life.
Senior Project began as a very stressful and agonizing course. It was a hard struggle to find a carpenter willing to work with me. Unexpected obstacles like liability insurance turned into roadblocks. Initially, I did not want to work with Dr. Huminski becuase a senior had worked with him last year. Now, I am very grateful that my senior project has turned out the way it did. Dr. Huminski is extremely knowledgeable about this trade and he has an immense amount of resources. More importantly, he is passionate about woodworking and is a wonderful teacher. He has been a great mentor and guide throughout this year. I have enjoyed my Senior Project immensly and I plan to continue woodworking throughout my life.
Friday, March 25, 2011
Spring Break Approaching
Dr. Huminski and I did not meet last weekend and we are not able to meet this weekend either. This will give us two weekends to work until my presentation on the 14th of April. The plan is to be finished with the building of the desk. Everything will hopefully be completed except for the staining. Dr. Huminski says the staining is something that does not need to be rushed. We have the desk lid and the cubby inside of the desk left to complete.
Wednesday, March 16, 2011
Coming Together
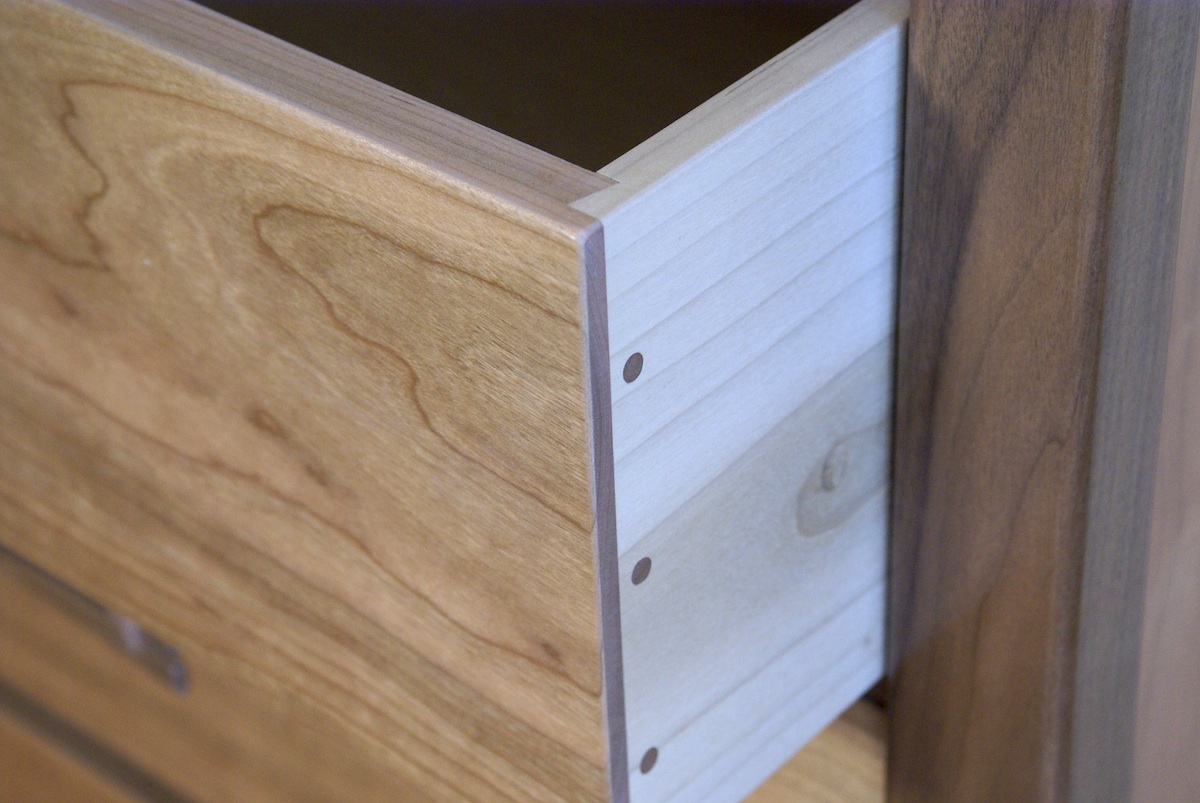
The desk has been coming together quickly over the past couple of weeks. What was put together for a dry run the weekend before is now glued together. In addition, the top board and desk top have also been attached. On Sunday, we built the draw and glued it together. We used a rabbit joint to create the draw.
 This is what a rabbit joint looks like. We used this method for all four sides of the draw. The draw proved trickery to put together than anticipated. After some time and force though, it came together. At the moment, every piece of the desk is completed except for the desk lid and the cubby inside the desk. I am in the process of designing the cubby right now according to my preference.
 This is what a rabbit joint looks like. We used this method for all four sides of the draw. The draw proved trickery to put together than anticipated. After some time and force though, it came together. At the moment, every piece of the desk is completed except for the desk lid and the cubby inside the desk. I am in the process of designing the cubby right now according to my preference.
Wednesday, March 9, 2011
Standing Tall
 Sunday was a very exciting day for Dr. Huminski and I. The two sides of the desk are complete. The backboard has been cut and fitted. I cut biscuit joints into the backboard and sides. Then came the dry run. We put all the finished pieces together without glue. We set the clamps on and as the clamps were tightened, the pieces came together beautifully. It was a challenge to find any gaps between the joints. We then lifted the desk and placed it standing on the table. I was surprised by how large the desk looked, towering over me. It was a wonderful sight to see.
Thursday, March 3, 2011
Filling in the Middle
I am done with both sides of the desk. They have been glued and clamped together and are now finished. Now, it is time to start filling in the middle. The width of the desk is 30 inches from the inside of each side leg. On Sunday, I worked for three hours on the desk. I cut the backboard to size and adjusted some pieces that had already been made to fit the 30 inch length between the two sides.
Mrs. Zion came to observe on Sunday as well. She took a lot of pictures so I will begin loading those on my the blog over the next few weeks. It was interesting for me to be able to show what I have been doing for the past five months. By showing her, I was able to see the incredible amount that I have learned in this time and the amount that I have been able to accomplish so far.
Wednesday, February 23, 2011
Desk Sides Glued
For the past two Sundays, I have been putting together the two sides of the desk. We had finished creating the pieces for the sides so now it was time to put the puzzle together. It has been a very exciting two weeks. I put together one side of the desk each week.
 This is a picture of one of the desk sides. At this point, it has not been glued. As you can see, there are many joints and sides to be fitted and glued. This process has to be done fairly quickly because of the limited drying time for the glue. For this reason, it is important to have a plan and all tools ready.
This picture was taken after the side had been glued. After gluing, the wood must be clamped together for a couple days. The clamps are twisted tightly to reduce the amount of gap space between the freshly glued pieces of wood. Dr. Huminski says that you can never have enough clamps. There are six on this piece of wood right now, but we added about three more after this picture was taken. Scrap pieces of wood are also placed between the clamps and the desk so that as they are tightened, the clamps do not leave indentions in the wood.

Thursday, February 17, 2011
Biscuit Time!
So far, I have only been using a mortise and tenon joint to put together my desk. On Sunday, I learned about and used a new joint called the biscuit joint.
 In a biscuit joint, you first use a biscuit machine to punch a half cresent shape into a piece of wood.

To join the two pieces, I spread glue in one

These are biscuits.

 In a biscuit joint, you first use a biscuit machine to punch a half cresent shape into a piece of wood.
 This is me using a biscuit machine.

This is what the half cresent holes look like. I punched these holes into the two pieces I was connecting so that when you put the pieces together, the holes line up and form an oval shaped hole.
To join the two pieces, I spread glue in one
of the cresent shaped holes and then put
a biscuit (the first picture) in one
of the sides of wood. Then I spread glue over the biscuit and
in the corresponding cresent hole and
push the two pieces together.
The two pieces come together and you have wood joined by biscuits.
Thursday, February 10, 2011
Seeing Beneath the Surface

Thursday, February 3, 2011
Gluing and Clamping


Friday, January 28, 2011
Working With Mistakes
On Sunday, I made my first significant mistake. I was cutting a mortise into a piece of wood and I did not properly center the cut. Dr. Huminski realized the mistake after it had been made. I had two choices. I could either increase the size of the mortise by one inch or I could scrap the piece of wood and start over. This piece of wood had already been fitted in an exact spot and held a second mortise for a different joint. For this reason, I decided that it would be too time consuming and impractical to start over with this piece of wood. Instead, I made the mortise and inch longer to center it. This will mean that the foot rest of the desk must be an inch wider. The only effect this has is not allowing a chair to be pushed under the desk quite so far. I am glad that I was able to work with my mistake and that it did not cause too much harm.
Thursday, January 13, 2011
Pictures At Last

Thursday, January 6, 2011
Ready to Get Back to Work
It has been a long time since I worked on my desk and I am ready to get back to work. I finished creating a timeline yesterday and I am now ready to work towards fulfilling it. By the end of January, I hope to finished with the carcass and begin putting in drawers and side and backboards in February and March. The end of March will be spent completing finishing touches as well as sanding and varnishing. I really think that it will be possible and very likely to finish the carcass before January is over. This would give me a pleasant head start on filling in the carcass with draws and boards.
Subscribe to:
Comments (Atom)